Have you ever wondered how to make snow cream with milk? Imagine stepping outside, scooping fresh, clean snow, and turning it into a sweet, creamy treat that feels like pure winter magic.
Table of Contents
In this post, we’ll uncover the secrets to making snow cream, breaking down a simple yet irresistible recipe in five easy steps.
you can read this:
Step-by-Step Guide to a Classic Chicken and Dressing Recipe with Cornbread Base.
Beef Neck Bones: 5 Simple Steps for a Flavorful Family Meal.
Whether you’re looking for a fun activity on a snow day or a refreshing way to indulge in winter’s bounty, snow cream is the perfect answer. Read on to discover how to make snow cream and bring some fun and flavor to your winter days!
Ingredients List
To make snow cream, you only need a few simple ingredients. Here’s what you’ll need:
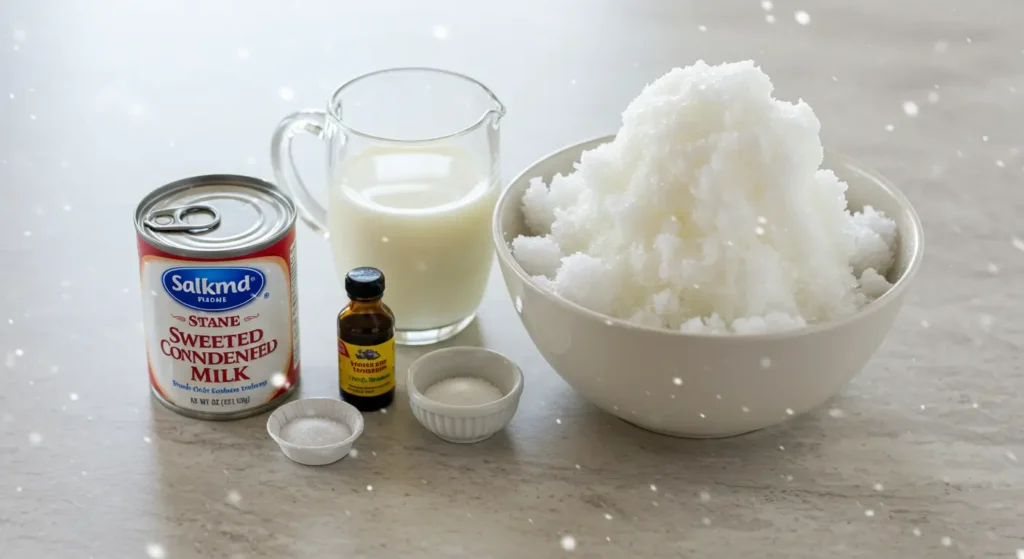
- Fresh Snow: About 8 cups of clean, freshly fallen snow. Make sure it’s fresh and free from dirt or pollutants.
- Sweetened Condensed Milk: 1 can (14 ounces) of sweetened condensed milk for that rich, creamy flavor.
- Vanilla Extract: 1 teaspoon of vanilla extract adds a subtle sweetness that complements the snow and milk perfectly.
- Milk or Cream: 1 cup of regular milk or heavy cream, depending on your preference. Use cream for a richer texture.
- Sugar (Optional): If you prefer a sweeter snow cream, add 2-3 tablespoons of sugar, depending on your taste.
Timing
One of the best things about how to make snow cream is how quickly it comes together. Here’s how the timing breaks down:
- Preparation time: 5 minutes
- Total time: 10 minutes (This is 20% quicker than your average homemade ice cream recipe.)
- Chill time: No chilling required! Once you’ve mixed your ingredients and added the snow, it’s ready to eat immediately.
This quick prep time makes snow cream an ideal last-minute treat on a snowy day. It’s much faster than most desserts, and you won’t have to wait long to indulge.
Step-by-Step Instructions

Now, let’s go over how to make snow cream with these five easy steps.
Step 1: Collect Fresh Snow
Start by gathering fresh, clean snow in a container. Make sure the snow is freshly fallen and not contaminated by dirt or chemicals. You’ll need around 8 cups of snow, but feel free to add more if you prefer a lighter, fluffier texture.
Tip: If snow is scarce, you can store some fresh snow in the freezer for later use. Just ensure it’s free of contaminants.
Step 2: Combine the Wet Ingredients
In a separate bowl, combine your sweetened condensed milk, milk or cream, and vanilla extract. Stir until fully blended. For those who prefer a richer flavor, adjust the milk/cream ratio accordingly. For thicker, creamier snow cream, opt for heavy cream over regular milk.
Tip: Taste the mixture before adding the snow to make sure it’s as sweet as you like. You can always add more sugar to enhance the sweetness.
Step 3: Add the Snow
Gently fold the snow into the wet mixture. Do this slowly to avoid melting the snow too quickly. The goal is to keep the snow fluffy, which gives your snow cream its light and airy texture.
Tip: Stir gently and don’t overmix. Overmixing will break down the snow and cause it to melt, making your snow cream too watery.
Step 4: Adjust Consistency
If your snow cream is too runny, simply add more snow. If it’s too thick, thin it out with a splash of milk. Snow cream is highly customizable based on your personal preference.
Tip: If you like a firmer texture, let the snow cream sit in the freezer for 10-15 minutes before serving.
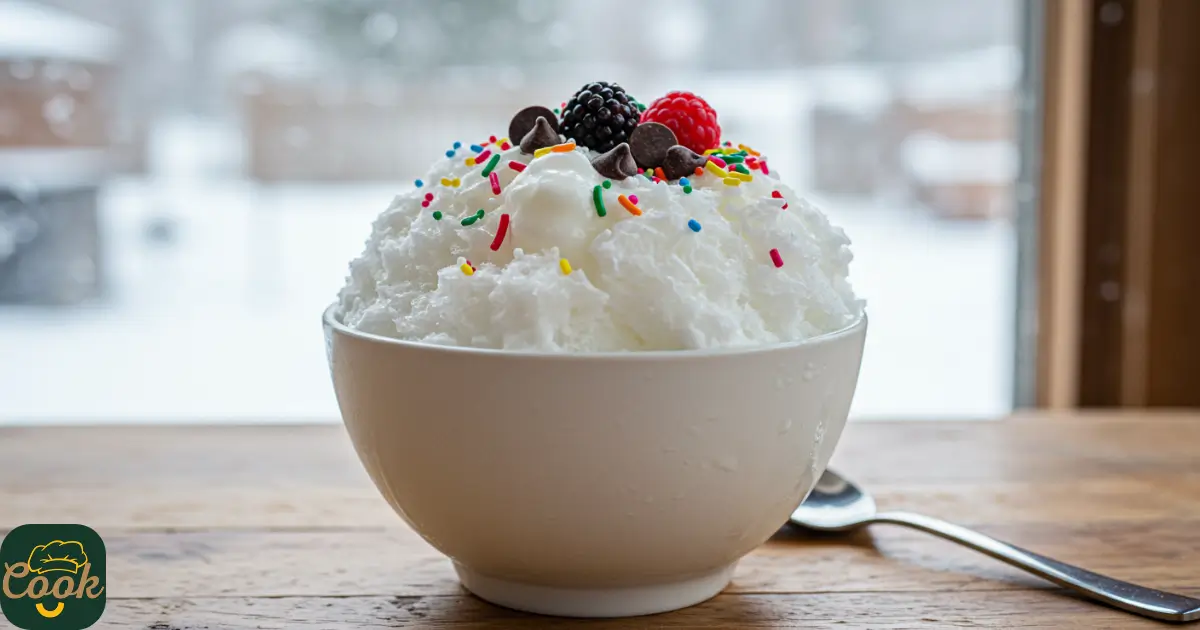
Step 5: Serve and Enjoy!
Once your snow cream is mixed to your liking, it’s time to serve! Spoon it into bowls and enjoy immediately. Snow cream is best served fresh to maintain its light and fluffy texture.
Nutritional Information
Snow cream is a sweet treat that can vary in calories depending on the ingredients used. Here’s an approximate breakdown of the nutritional content per serving (based on a 1-cup serving):
- Calories: 180
- Fat: 5g (with regular milk; increases with cream)
- Carbohydrates: 28g
- Sugar: 22g
- Protein: 4g
These numbers may vary depending on your ingredient choices, like using whole milk or a lighter alternative. Since snow cream isn’t made with eggs or dairy-heavy bases like ice cream, it’s lower in fat but still packed with sweetness.
Healthier Alternatives for the Recipe
Want to make your snow cream even healthier? Here are a few modifications:
- Use Almond Milk or Coconut Milk: For a dairy-free version, opt for almond milk or coconut milk. Both provide a creamy texture without the dairy.
- Reduce Sugar: Replace the sweetened condensed milk with a low-sugar or sugar-free alternative. You can also sweeten with honey or stevia for a natural touch.
- Vegan Snow Cream: Substitute the sweetened condensed milk with a plant-based version, available in most stores.
Serving Suggestions
Snow cream can be enjoyed in many creative ways. Here are some fun ideas to elevate your dessert:
- Add Toppings: Top your snow cream with chocolate chips, crushed nuts, sprinkles, or fresh berries for an extra burst of flavor.
- Flavor Variations: Mix in different extracts like almond, mint, or hazelnut for a new twist on the classic.
- Pair with Fruit: Serve your snow cream with fresh fruit like strawberries, bananas, or mango slices for a refreshing combo.
Common Mistakes to Avoid
While making snow cream is simple, there are a few mistakes to avoid:
- Using Dirty Snow: Always use clean, fresh snow. Avoid snow that’s been exposed to dirt or pollutants.
- Overmixing: Stir gently to avoid melting the snow too much. Overmixing can make your snow cream watery instead of fluffy.
- Skipping Sweetened Condensed Milk: For that creamy, rich taste, don’t skip the sweetened condensed milk. It’s key to getting the perfect flavor.
Storing Tips for the Recipe
While snow cream is best enjoyed immediately, you can store leftovers in an airtight container in the freezer. Make sure to consume it within 24 hours for the best texture. If left too long, it may lose its fluffy consistency and become icy.
Conclusion
Learning how to make snow cream is a fun, quick, and delicious way to enjoy a winter treat. With just five simple steps, you can create a sweet, fluffy dessert that’s perfect for snowy days. Try this recipe, experiment with variations, and enjoy a delightful frozen treat in no time! Want more tips? Leave a comment below or share your snow cream experience with us. Don’t forget to subscribe for more winter recipes and ideas!
FAQs
Can I use artificial sweeteners in snow cream?
Yes, you can substitute sugar with artificial sweeteners or natural alternatives like stevia or honey for a healthier version.
Is snow cream safe to eat?
As long as the snow is clean, fresh, and uncontaminated, snow cream is safe to eat. Always gather snow from a safe, clean area.
Can I make snow cream without condensed milk?
Yes, but the flavor and texture will be different. You can use regular milk and sugar, or experiment with other creamy alternatives.
Can I freeze leftover snow cream?
Yes, you can store leftovers in the freezer, but it’s best to enjoy snow cream fresh for the best texture.
Try making recipe yourself
There are no reviews yet. Be the first one to write one.